拜读及分析Element源码组件-input篇

element-ui源码详细分析以及在其中可以学到的东西整理。(有问题欢迎指正与讨论)

首先看生命周期做了什么

1
2
3
4
5
6
7
8
9
10
11
12
13
14
15
16
created() {
// 与select组件相关联 (若select组件已发布inputSelect事件则触发选中)
this.$on('inputSelect', this.select);
},

mounted() {
// 动态文本域(高度)
this.resizeTextarea();
// 前置后置元素偏移(样式)
this.updateIconOffset();
},

updated() {
// 视图重绘完毕后 前置后置偏移(样式)
this.$nextTick(this.updateIconOffset);
}

外层DIV绑定的一些class

插槽及一些props传入的参数控制外层样式

1
2
3
4
5
6
7
8
9
10
11
12
13
14
15
16
17
18
19
20
21
22
23
24
25
26
27
28
29
30
31
  <div :class="[
type === 'textarea' ? 'el-textarea' : 'el-input',
inputSize ? 'el-input--' + inputSize : '',
{
'is-disabled': inputDisabled,
'el-input-group': $slots.prepend || $slots.append,
'el-input-group--append': $slots.append,
'el-input-group--prepend': $slots.prepend,
'el-input--prefix': $slots.prefix || prefixIcon,
'el-input--suffix': $slots.suffix || suffixIcon || clearable
}
]"
@mouseenter="hovering = true"
@mouseleave="hovering = false"
>
<!-- 内部被分为
input结构 与 textarea结构
-->
</div>
<!--
动态class
具名插槽
$slots.prepend: 前置插槽
$slots.append: 后置插槽
$slots.prefix: 前置icon插槽
$slots.suffix: 后置icon插槽
不使用插槽的icon
prefixIcon: 前置icon
suffixIcon: 后置icon
clearable: 后置是否清空
-->

实例属性$slots用来访问被插槽分发的内容

  • vm.$slots.foo 访问具名插槽foo
  • vm.$slots.default 没有被包含在具名插槽中的节点

有多个条件 class 时:

  • 可以用数组结合对象的写法

内层input结构

1
2
3
4
5
6
7
8
9
10
11
12
13
14
15
16
17
18
19
20
21
22
23
24
25
26
27
28
29
30
31
32
33
34
35
36
37
38
39
40
41
<!-- 输入框结构 -->
<template v-if="type !== 'textarea'">
<!-- 前置元素 -->
<div class="el-input-group__prepend" v-if="$slots.prepend">
...
</div>
<input
:tabindex="tabindex"
v-if="type !== 'textarea'"
class="el-input__inner"
v-bind="$attrs"
:type="type"
:disabled="inputDisabled"
:readonly="readonly"
:autocomplete="autoComplete"
:value="currentValue"
ref="input"
@compositionstart="handleComposition"
@compositionupdate="handleComposition"
@compositionend="handleComposition"
@input="handleInput"
@focus="handleFocus"
@blur="handleBlur"
@change="handleChange"
:aria-label="label"
>
<!-- 前置内容 -->
<span class="el-input__prefix" v-if="$slots.prefix || prefixIcon">
...
</span>
<!-- 后置内容 -->
<span
class="el-input__suffix"
v-if="$slots.suffix || suffixIcon || showClear || validateState && needStatusIcon">
...
</span>
<!-- 后置元素 -->
<div class="el-input-group__append" v-if="$slots.append">
...
</div>
</template>

前置后置内容及插槽:基本上都是通过props接收的变量或者插槽控制样式及位置偏移,这里我就先“…”了

中文输入法相关的事件

  • compositionstart
  • compositionupdate
  • compositionend

首先会看到input上绑定了这三个事件(在下孤陋寡闻没有见过),于是尝试一下触发时机
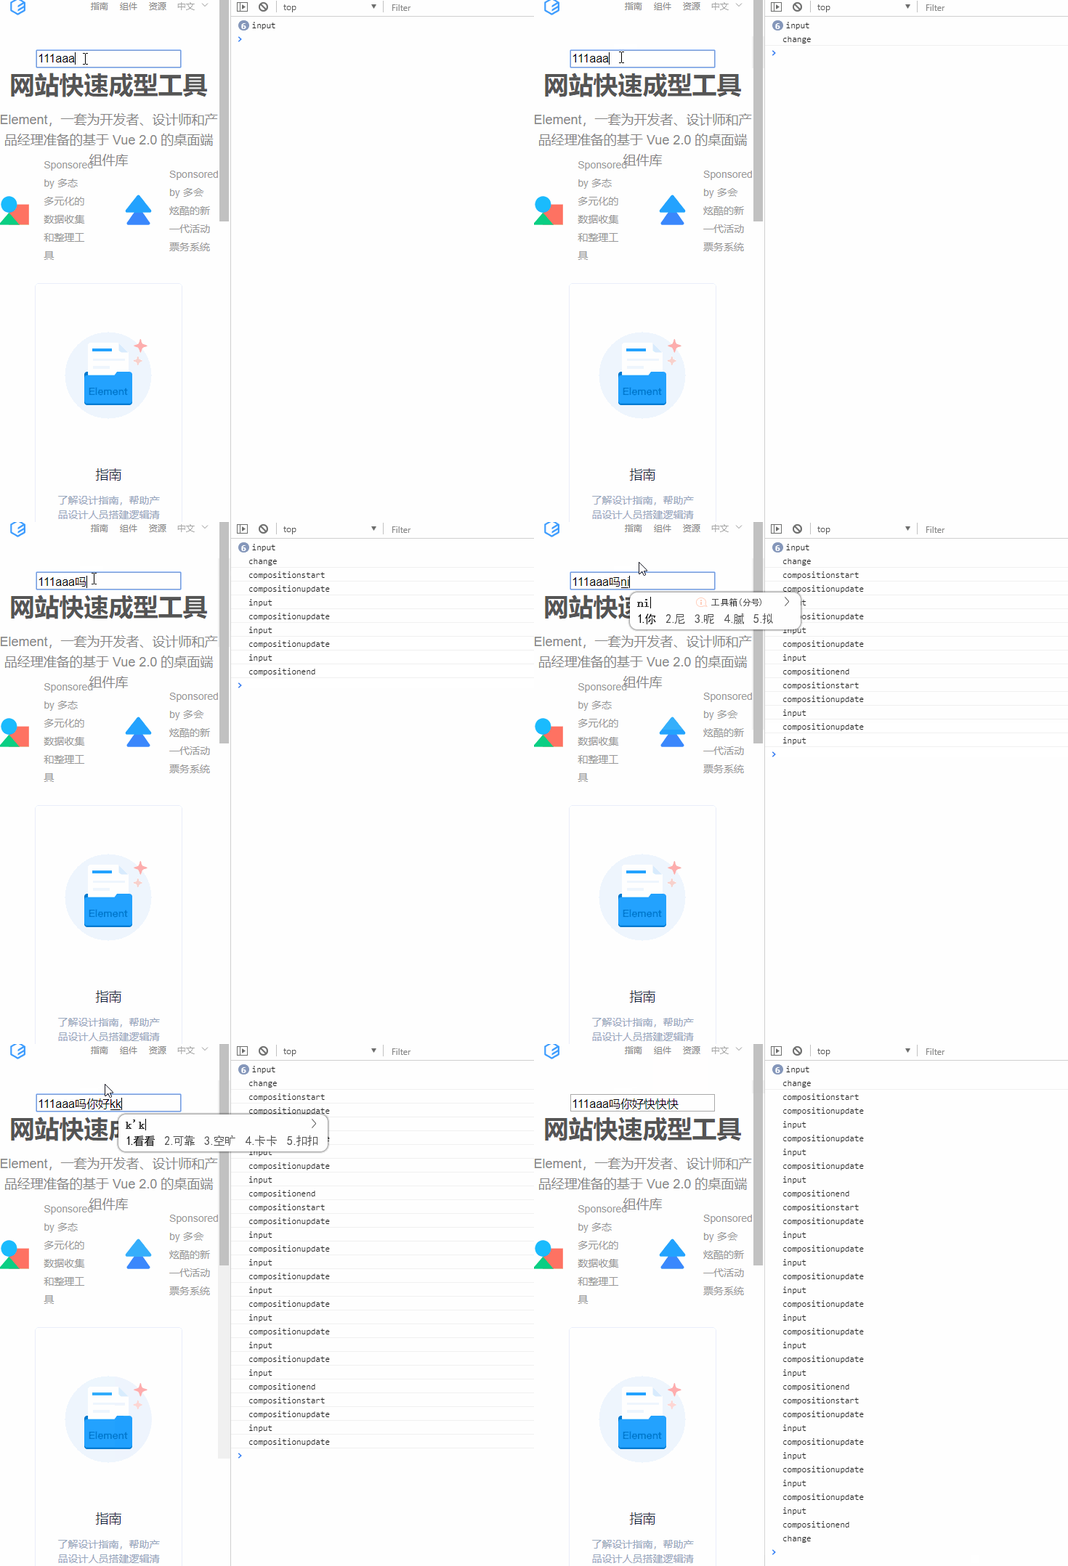
根据上图可以看到

  • 输入到input框触发input事件
  • 失去焦点后内容有改变触发change事件
  • 识别到你开始使用中文输入法触发compositionstart 事件
  • 未输入结束但还在输入中触发compositionupdate 事件
  • 输入完成(也就是我们回车或者选择了对应的文字插入到输入框的时刻)触发compositionend事件。

查阅资料后发现,这三个事件不仅包括中文输入法还包括语音识别

下面是MDN上的解释

类似于 keydown 事件,但是该事件仅在若干可见字符的输入之前,而这些可见字符的输入可能需要一连串的键盘操作、语音识别或者点击输入法的备选词

那么问题来了 为什么要使用这几个事件呢

因为input组件常常跟form表单一起出现,需要做表单验证

为了解决中文输入法输入内容时还没将中文插入到输入框就验证的问题

我们希望中文输入完成以后才验证

不曾用过的属性

特指本渣눈.눈

  • $attrs: 获取到子组件props没有注册的,除了style和class以外所有父组件的属性。(感觉好强!)
  • tabindex: 原生属性, 元素的 tab 键控制次序(具体的自行查阅)
  • readonly :原生属性,只读。(true时input框不可修改)
  • autoComplete:原生属性 当用户在字段开始键入时,浏览器基于之前键入过的值,是否显示出在字段中填写的选项。
  • aria-label:原生属性,tab到输入框时,读屏软件就会读出相应label里的文本。

内层textarea 结构

1
2
3
4
5
6
7
8
9
10
11
12
13
14
15
16
17
18
19
20
21
<!-- 文本域结构 -->
<textarea
v-else
:tabindex="tabindex"
class="el-textarea__inner"
:value="currentValue"
@compositionstart="handleComposition"
@compositionupdate="handleComposition"
@compositionend="handleComposition"
@input="handleInput"
ref="textarea"
v-bind="$attrs"
:disabled="inputDisabled"
:readonly="readonly"
:style="textareaStyle"
@focus="handleFocus"
@blur="handleBlur"
@change="handleChange"
:aria-label="label"
>
</textarea>

绑定的事件及属性与input差不多,区别是textarea动态控制高度的style

textarea 高度自适应

props

  • autosize 自适应高度的配置
  • resize 是否缩放
1
2
3
4
5
6
7
8
9
10
11
12
13
14
15
16
17
18
19
20
21
22
23
24
computed: {
textareaStyle() {
// merge 从src/utils/merge.js引入 合并对象的方法
return merge({}, this.textareaCalcStyle, { resize: this.resize });
},
},
methods: {
resizeTextarea() {
// 是否运行于服务器 (服务器渲染)
if (this.$isServer) return;
const { autosize, type } = this;
if (type !== 'textarea') return;
if (!autosize) {
this.textareaCalcStyle = {
minHeight: calcTextareaHeight(this.$refs.textarea).minHeight
};
return;
}
const minRows = autosize.minRows;
const maxRows = autosize.maxRows;

this.textareaCalcStyle = calcTextareaHeight(this.$refs.textarea, minRows, maxRows);
}
}

calcTextareaHeight 是calcTextareaHeight.js里的方法,计算文本域高度及设置样式

我就直接贴代码和分析的注释了

1
2
3
4
5
6
7
8
9
10
11
12
13
14
15
16
17
18
19
20
21
22
23
24
25
26
27
28
29
30
31
32
33
34
35
36
37
38
39
40
41
42
43
44
45
46
47
48
49
50
51
52
53
54
55
56
57
58
59
60
61
62
63
64
65
66
67
68
69
70
71
72
73
74
75
76
77
78
79
80
81
82
83
84
85
86
87
88
89
90
91
92
93
94
95
96
97
98
99
100
101
102
103
104
105
106
107
108
109
110
111
112
113
114
115
116
117
118
119
120
121
122
123
124
125
126
127
128
129
130
let hiddenTextarea;

// 预设的一些样式
const HIDDEN_STYLE = `
height:0 !important;
visibility:hidden !important;
overflow:hidden !important;
position:absolute !important;
z-index:-1000 !important;
top:0 !important;
right:0 !important
`;

// 预计要用的一些样式属性
const CONTEXT_STYLE = [
'letter-spacing',
'line-height',
'padding-top',
'padding-bottom',
'font-family',
'font-weight',
'font-size',
'text-rendering',
'text-transform',
'width',
'text-indent',
'padding-left',
'padding-right',
'border-width',
'box-sizing'
];

// 获取到一些需要用到的样式
function calculateNodeStyling(targetElement) {
// 获取最终作用到元素的所有样式(返回CSSStyleDeclaration对象)
const style = window.getComputedStyle(targetElement);

// getPropertyValue为CSSStyleDeclaration原型上的方法获取到具体的样式
const boxSizing = style.getPropertyValue('box-sizing');

// 上下内边距
const paddingSize = (
parseFloat(style.getPropertyValue('padding-bottom')) +
parseFloat(style.getPropertyValue('padding-top'))
);

// 上下边框宽度
const borderSize = (
parseFloat(style.getPropertyValue('border-bottom-width')) +
parseFloat(style.getPropertyValue('border-top-width'))
);

// 取出预计要用的属性名和值,以分号拼接成字符串
const contextStyle = CONTEXT_STYLE
.map(name => `${name}:${style.getPropertyValue(name)}`)
.join(';');

// 返回预设要用的样式字符串,上下内边距和, 边框和, boxSizing属性值
return { contextStyle, paddingSize, borderSize, boxSizing };
}

export default function calcTextareaHeight(
targetElement,
minRows = 1,
maxRows = null
) {
// hiddenTextarea不存在则创建textarea元素append到body中
if (!hiddenTextarea) {
hiddenTextarea = document.createElement('textarea');
document.body.appendChild(hiddenTextarea);
}
// 取出以下属性值
let {
paddingSize,
borderSize,
boxSizing,
contextStyle
} = calculateNodeStyling(targetElement);

// 给创建的hiddenTextarea添加行内样式并赋值value或palceholder,无则''
hiddenTextarea.setAttribute('style', `${contextStyle};${HIDDEN_STYLE}`);
hiddenTextarea.value = targetElement.value || targetElement.placeholder || '';

// 获取元素自身高度
let height = hiddenTextarea.scrollHeight;
const result = {};

// boxSizing不同 高度计算不同
if (boxSizing === 'border-box') {
// border-box:高度 = 元素自身高度 + 上下边框宽度和
height = height + borderSize;
} else if (boxSizing === 'content-box') {
// content-box: 高度 = 高度 - 上下内边距和
height = height - paddingSize;
}

hiddenTextarea.value = '';
// 单行文字的高度
let singleRowHeight = hiddenTextarea.scrollHeight - paddingSize;

// minRows最小行存在
if (minRows !== null) {
// 最小高度 = 单行高度 * 行数
let minHeight = singleRowHeight * minRows;
if (boxSizing === 'border-box') {
// border-box则加上内边距及边框
minHeight = minHeight + paddingSize + borderSize;
}
// minHeight与height取最大值给height赋值
height = Math.max(minHeight, height);
result.minHeight = `${ minHeight }px`;
}
// 最大行存在
if (maxRows !== null) {
// 逻辑同上
let maxHeight = singleRowHeight * maxRows;
if (boxSizing === 'border-box') {
maxHeight = maxHeight + paddingSize + borderSize;
}
// maxHeight与height取最小值给height赋值
height = Math.min(maxHeight, height);
}
result.height = `${ height }px`;
// 计算完成后移除hiddenTextarea元素
hiddenTextarea.parentNode && hiddenTextarea.parentNode.removeChild(hiddenTextarea);
hiddenTextarea = null;

// 暴露包含minHeight及height的对象
return result;
};

需要注意的一些点

form组件中嵌套input组件时样式也会受form一些注入属性的控制。

1
2
3
4
5
6
7
8
9
// 接收form组件注入的属性
inject: {
elForm: {
default: ''
},
elFormItem: {
default: ''
}
}
  • size(input的大小)

  • this.elFormItem.validateState: 与表单验证关联 ,控制表单验证时icon的样式(红x之类的)

1
2
3
4
5
6
7
8
9
10
11
12
13
14
15
16
17
computed: {
// 表单验证相关
validateState() {
return this.elFormItem ? this.elFormItem.validateState : '';
},
needStatusIcon() {
return this.elForm ? this.elForm.statusIcon : false;
},
// 表单验证样式
validateIcon() {
return {
validating: 'el-icon-loading',
success: 'el-icon-circle-check',
error: 'el-icon-circle-close'
}[this.validateState];
}
}

props的validateEvent属性:时间选择器会传入false其他默认true (意思大概true是需要做校验),以下是用到validateEvent的methods

1
2
3
4
5
6
7
8
9
10
11
12
13
14
15
16
17
18
19
20
21
22
23
24
25
26

handleBlur(event) {
this.focused = false;
// 暴露blur事件
this.$emit('blur', event);
if (this.validateEvent) {
// 向上找到ElFormItem组件发布el.form.blur事件并传值
this.dispatch('ElFormItem', 'el.form.blur', [this.currentValue]);
}
},
setCurrentValue(value) {
// 还在输入并且内容与之前内容相同 return
if (this.isOnComposition && value === this.valueBeforeComposition) return;
// input内容赋值
this.currentValue = value;
// 还在输入return
if (this.isOnComposition) return;
this.$nextTick(_ => {
this.resizeTextarea();
});
// 除了时间选择器其他组件中使用默认为true
if (this.validateEvent) {
// mixin中的方法 意思是向上找到ElFormItem组件发布el.form.change事件并传递当前input内容
this.dispatch('ElFormItem', 'el.form.change', [value]);
}
}

dispatch这个方法开始我以为是触发vuex的方法结果是mixin里的

路径: src/mixins/emitter.js

1
2
3
4
5
6
7
8
9
10
11
12
13
14
15
16
17
// 接收组件名,事件名,参数
dispatch(componentName, eventName, params) {
var parent = this.$parent || this.$root;
var name = parent.$options.componentName;

// 寻找父级,如果父级不是符合的组件名,则循环向上查找
while (parent && (!name || name !== componentName)) {
parent = parent.$parent;
if (parent) {
name = parent.$options.componentName;
}
}
// 找到符合组件名称的父级后,发布传入事件。
if (parent) {
parent.$emit.apply(parent, [eventName].concat(params));
}
}

导入的Migrating

迭代api友好提示 方便由于用了移除的api报错 找出问题在哪 参见methos中getMigratingConfig事件及src/mixins/migrating.js

疑问

1
2
3
4
5
6
7
8
9
10
11
12
13
14
15
16
17
18
19
20
21
22
23
24
25
26
27
28
29
// 判断韩文的方法(不清楚为什么)
import { isKorean } from 'element-ui/src/utils/shared';

methods: {
// 中文或语音输入开始 中 后 触发详见↑
handleComposition(event) {
// 完成输入时
if (event.type === 'compositionend') {
// 输入中标识为false
this.isOnComposition = false;
// 中文或语音输入前的值赋值给当前
this.currentValue = this.valueBeforeComposition;
// 清空之前的值
this.valueBeforeComposition = null;
// 赋值并且向父组件暴露input方法
this.handleInput(event);
// 未完成时
} else {
const text = event.target.value;
const lastCharacter = text[text.length - 1] || '';
// 最后一个字符不是韩文就是在输入中(不是很理解为什么要判断最后一个字符是否是韩语)
this.isOnComposition = !isKorean(lastCharacter);
// 输入开始前
if (this.isOnComposition && event.type === 'compositionstart') {
this.valueBeforeComposition = text;
}
}
}
}
------ 本文结束------
0%