better-scoll的封装与使用

better-scroll是解决各种滚动场景需求的插件,由于一般移动端项目滚动的场景特别多,所以会对其进行封装复用

Vue中的better-scroll学习及使用

better-scroll 中文文档 ✌ 点击传送

首先大概了解一下该插件的滚动原理

  • 父容器有一个固定高度
  • 第一个子元素,高度会随内容进行变化
  • 当内容高度不超过父容器不滚动,超过父容器就可以滚动
重点:better-scroll对外暴露了一个BScroll的类,我们初始化只需要neiw一个实例,第一个参数为父容器的DOM,第二个参数是一些配置。
  • 初始化时会子酸父元素和子元素的高度和宽度,才能决定是否可以滚动,所以初始化时必须确保父元素与子元素已经渲染。否则会出现不可滚动的情况
  • 当子元素或者父元素DOM结果发生变化(通常也就是数据发生变化)需要冲洗调用refresh()方法重新计算高度

写一个基础的scroll组件

dom结构很简单

1
2
3
4
5
6
7
<template>
// 父容器
<div ref="wrapper">
// 插槽
<slot></slot>
</div>
</template>
1
2
3
4
5
6
7
8
9
10
11
12
13
14
15
16
17
18
19
20
21
22
23
24
25
26
27
28
29
30
31
32
33
34
35
36
37
38
39
40
41
42
43
44
45
46
47
48
49
50
51
52
53
54
55
56
57
58
59
60
61
62
63
64
65
66
67
68
69
70
71
72
73
74
75
76
77
78
79
80
81
82
83
84
85
86
87
88
89
90
91
92
93
<script>
// 先引入better-scroll
improt Bscroll 'better-scroll'
export default {
// 可接收的值
props: {
// 组件的一个属性可以看文档:为0时不派发scroll事件,1时滑动超过一定事件派发scroll事件,2时滑动过程中时时派发scroll事件,3时不仅滑动时时时派发,另一个属性momentum为true开启动画,动画也派发scroll事件
probeType: {
type: Number,
default: 1
},
click: {
type: Boolean,
default: true
},
// 数据影响滑动,所以需要接收对应数据
data: {
type: Array,
default: null
},
// 监听滚动
listenScroll: {
type: Boolean,
default: false
}
mounted() {
// 初始化时机 在dom已渲染
setTimeout(() => {
this._initScroll()
}, 20)
},
methods: {
// 初始化方法
_initScroll() {
// 防错 避免undefined
if(!this.$refs.wrapper) {
return
}
// 第一个参数为父容器dom 第二个参数为一些配置参数
this.scroll = new BScroll(this.$refs.wrapper, {
probeType: this.probeType, // 派发scroll的模式
click: this.click
})
// 如果有监听listenScroll
// 记录Vue实例的this
let me = this
if(this.listenScroll) {
// 监听scroll事件并且派发scroll时间把pos位置传出去
// 触发时机:滚动过程中,具体时机取决于选项中的 probeType
// 具体可以查阅官方文档
this.scroll.on('scroll', pos => {
// 这个回调里的this执行better-scroll 所以要记录Vue实例的this
// pos是位置
me.$emit('scroll', pos)
})
}
},
// 以下都是better-scroll的API
// 启用
enable() {
this.scroll && this.scroll.enable()
},
// 禁用
disable() {
this.scroll && this.scroll.disable()
}
// 刷新scroll 重新计算
refresh() {
this.scroll && this.scroll.refresh()
},
// 滚动到指定位置 参数为x坐标(px),y坐标(px),滚动动画时长(ms),缓动函数,默认easing
scrollTo() {
// apply是为了保证指向Vue实例
// scrollTo的this指向better-scroll
this.scroll && this.scroll.scrollTo.apply(this.scroll, arguments)
},
// 滚动到目标元素 参数:el滚动到的目标元素,滚动动画时长(ms),offsetX相对目标元素横向偏移量(px)如果直接设为true则中心,offsetY同理,缓动动画 默认easing
scrollToElement() {
this.scroll && this.scroll.scrollToElment.apply(this.scroll, arguments)
}

},
watch: {
// 当数据发生变化时重新计算scoll
data() {
setTimeout(() => {
this.refresh()
}, 20)
}
}
}
}
</script>

使用上面封装的组件

引入scroll组件 并在页面注册 然后在template中使用

test1

1
2
3
4
5
6
7
8
9
10

<template>
<scroll ref="listWrapper" :data="list">
<div class="content">
<div class="list1" v-for="item1 in list1">
<span>item1</span>
</div>
</div>
</scroll>
</template>

将获取到的list数据传入scroll组件,scroll组件watch到data变化会重新计算高度,这是如果内容超过父容器就可以正常滑动了

test2

1
2
3
4
5
6
7
8
9
10
11
12
<template>
<scroll ref="listWrapper" :data="list">
<div class="content">
<div class="list1" v-for="item1 in list1">
<span>item1</span>
</div>
<div class="list2" v-for="item2 in list2">
<span>item2</span>
</div>
</div>
</scroll>
</template>

当一个滑动出现两个或两个以上由内容撑开高度异步获取的情况,要确保都获取到数据以后再传data,或者手动调用refresh方法 this.$refs.listWrapper.refresh()重新计算

test3 实现点击右侧字母左侧滑动到对应位置以及滑动右侧左侧滑动到对应位置

效果图
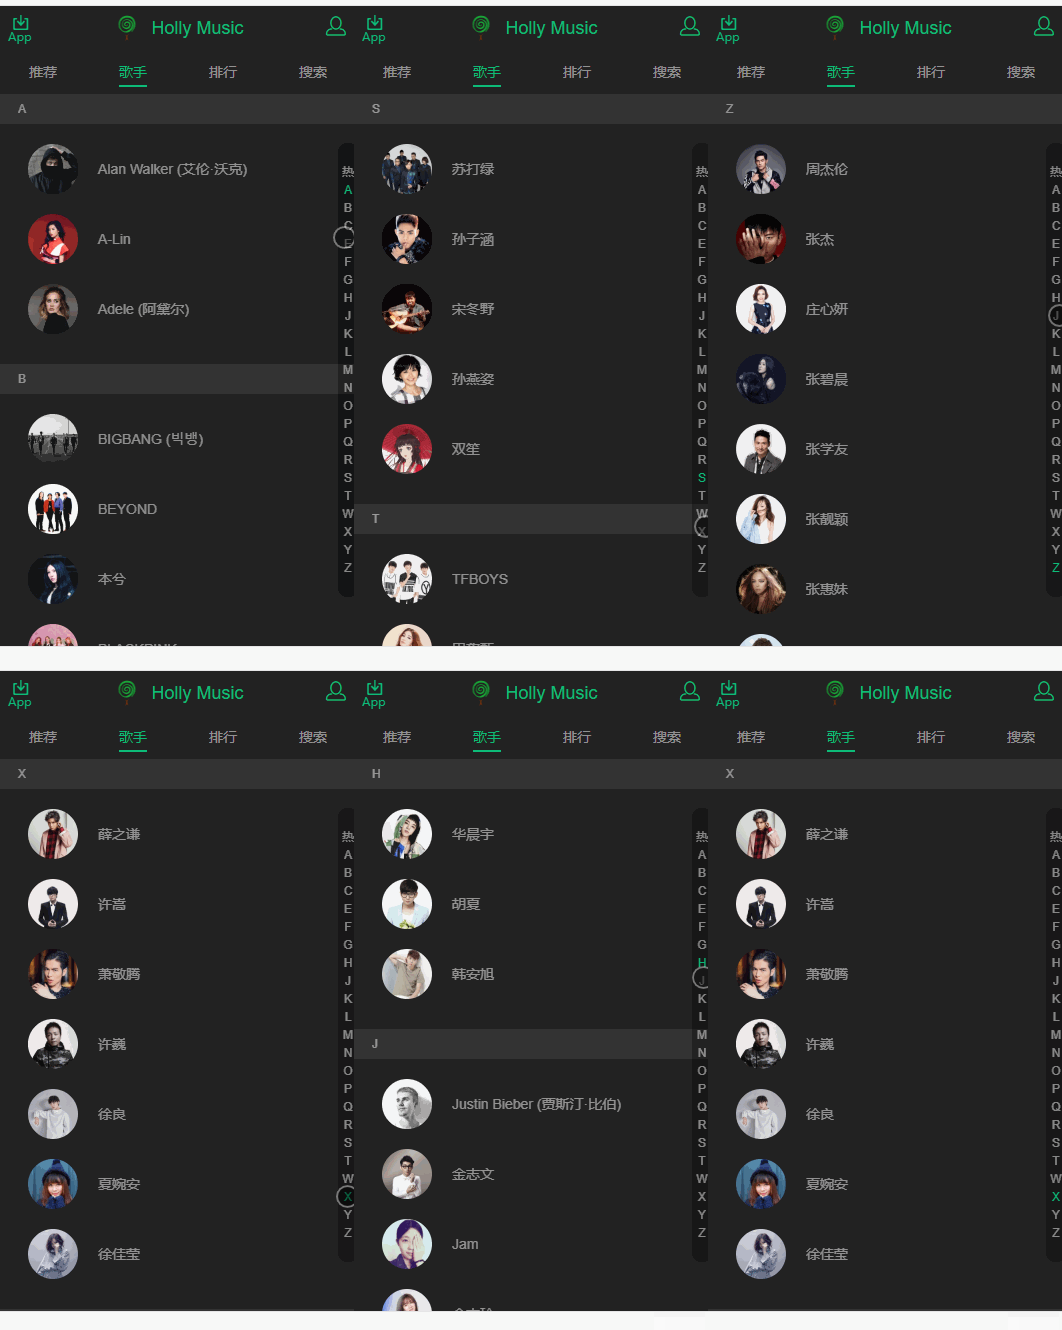
首先引入上面封装的scroll组件 并在页面注册 然后在template中使用

左侧数据与右侧数据的索引是对应好的

1
2
3
4
5
6
7
8
9
10
11
12
13
14
15
16
17
18
19
20
21
22
23
24
25
26
27
28
29
30
31
32
33
34
35
36
37
38
39
40
41
42
43
44
45
46
47
48
49
50
51
52
53
54
55
56
57
58
59
60
61
62
63
64
65
66
67
68
69
70
71
72
73
74
75
76
77
78
79
80
81
82
83
84
85
86
87
88
89
90
91
92
93
94
95
96
97
98
99
100
101
102
103
104
105
106
107
108
109
110
111
112
113
114
115
116
117
118
119
120
121
122
123
124
125
126
127
128
129
130
131
132
133
134
135
136
137
138
139
140
141
142
143
144
145
146
147
148
149
150
151
152
153
154
155
156
157
158
159
160
161
162
163
164
165
166
167
168
169
170
171
172
173
174
175
176
177
178
179
180
181
182
183
184
185
186
187
188
189
190
191
192
193
194
195
196
197
198
199
200
201
202
203
<template>
<scroll @scroll="scroll"
:listen-scroll="listenScroll"
:probe-type="probeType"
:data="data"
class="listview"
ref="listview">
<--左侧列表-->
<ul>
<li v-for="group in data" class="list-group" ref="listGroup">
<h2 class="list-group-title">{{group.title}}</h2>
<uL>
<li @click="selectItem(item)" v-for="item in group.items" class="list-group-item">
<img class="avatar" v-lazy="item.avatar">
<span class="name">{{item.name}}</span>
</li>
</uL>
</li>
</ul>
<--右侧字母-->
<div class="list-shortcut" @touchstart.stop.prevent="onShortcutTouchStart" @touchmove.stop.prevent="onShortcutTouchMove"
@touchend.stop>
<ul>
<--左侧滚动右侧实时高亮-->
<li v-for="(item, index) in shortcutList" :data-index="index" class="item"
:class="{'current':currentIndex===index}">{{item}}
</li>
</ul>
</div>
<div class="list-fixed" ref="fixed" v-show="fixedTitle">
<div class="fixed-title">{{fixedTitle}} </div>
</div>
</scroll>
</template>

<script type="text/ecmascript-6">
import Scroll from 'src/base/scroll/scroll'
// 左侧title高度 根据样式来的 const是为了以后有变化好统一处理
const TITLE_HEIGHT = 30
// 右侧每个li的高度
const ANCHOR_HEIGHT = 18

export default {
props: {
data: {
type: Array,
default: []
}
},
computed: {
shortcutList() {
return this.data.map((group) => {
return group.title.substr(0, 1)
})
},
fixedTitle() {
if (this.scrollY > 0) {
return ''
}
return this.data[this.currentIndex] ? this.data[this.currentIndex].title : ''
}
},
data() {
return {
scrollY: -1,
currentIndex: 0,
diff: -1
}
},
created() {
this.probeType = 3
this.listenScroll = true
this.touch = {}
this.listHeight = []
},
methods: {
// 设置或获取自定义属性的方法
getData(el, name, val) {
const prefix = 'data-'
if(val) {
//有第三个参数时set
return el.setAttribute(prefix + name, val)
} else {
// 没有第三个参数时get
return el.getAttribute(prefix + name)
}
},
selectItem(item) {
this.$emit('select', item)
},
// 点击右侧字母时
onShortcutTouchStart(e) {
// dom中已经设置了自定义属性 :data-index="index" 直接获取得到索引
let anchorIndex = this.getData(e.target, 'index')
// 调用组件滚动到元素的方法 滚动到左侧列表对应的index Dom元素
// 由于比较长 多处会用到可以进行封装 见_scrollTo
//this.$refs.listview.scrollToElement(this.$refs.listGroup[anchorIndex])
// 记录第一个touches手指的位置
let firstTouch = e.touches[0]
// 记录start的Y值
this.touch.y1 = firstTouch.pageY
// 记录index
this.touch.anchorIndex = anchorIndex
// 左侧列表滑动到指定元素位置
this._scrollTo(anchorIndex)
},
// 滑动过程中 列表跟随滚动 需要记录start的Y值计算差
onShortcutTouchMove(e) {
// 记录滑动第一个手指位置的Y值
let firstTouch = e.touches[0]
this.touch.y2 = firstTouch.pageY
// 获得start和move的Y值差 / 右侧每个li的高度(ANCHOR_HEIGHT)| 0 也就是向下取整
// 也就是获得了偏移了几个元素
let delta = (this.touch.y2 - this.touch.y1) / ANCHOR_HEIGHT | 0
// 新的元素位置就是start记录的索引+delta
let anchorIndex = parseInt(this.touch.anchorIndex) + delta
// 滑动到指定元素位置
this._scrollTo(anchorIndex)
},
refresh() {
this.$refs.listview.refresh()
},
// 记录实时滚动的Y值
scroll(pos) {
this.scrollY = pos.y
},
// 计算每个左侧列表的高度
_calculateHeight() {
this.listHeight = []
const list = this.$refs.listGroup
let height = 0
this.listHeight.push(height)
for (let i = 0; i < list.length; i++) {
let item = list[i]
height += item.clientHeight
this.listHeight.push(height)
}
},
_scrollTo(index) {
if (!index && index !== 0) {
return
}
// 点击右侧时 scrollY赋值实现高亮 因为点击时左侧没有派发scroll事件没有更新scrollY
// 需要根据逻辑手动给scrollY赋值
if (index < 0) {
// 顶部
index = 0
} else if (index > this.listHeight.length - 2) {
// 底部
index = this.listHeight.length - 2
}
this.scrollY = -this.listHeight[index]
// 左侧滚动到指定位置
this.$refs.listview.scrollToElement(this.$refs.listGroup[index], 0)
}
},
watch: {
data() {
// data发生改变时 重新计算左侧每个列表高度
setTimeout(() => {
this._calculateHeight()
}, 20)
},
// 滑动位置发生变化时
scrollY(newY) {
// 三种情况 顶部 中间 底部
const listHeight = this.listHeight
// 当滚动到顶部,newY>0
if (newY > 0) {
this.currentIndex = 0
return
}
// 在中间部分滚动
for (let i = 0; i < listHeight.length - 1; i++) {
let height1 = listHeight[i]
let height2 = listHeight[i + 1]
// 两个元素之间
if (-newY >= height1 && -newY < height2) {
this.currentIndex = i
this.diff = height2 + newY
return
}
}
// 当滚动到底部,且-newY大于最后一个元素的上限
// 2的原因是 listHeight在创建时比元素多一个 并且底部以元素的上线位置为准
this.currentIndex = listHeight.length - 2
},
diff(newVal) {
let fixedTop = (newVal > 0 && newVal < TITLE_HEIGHT) ? newVal - TITLE_HEIGHT : 0
if (this.fixedTop === fixedTop) {
return
}
// 当偏移量小于title的高度时才transfrom 其它情况不变依然fix在列表顶部
this.fixedTop = fixedTop
this.$refs.fixed.style.transform = `translate3d(0,${fixedTop}px,0)`
}
},
components: {
Scroll

}

</script>

达到左右互相联动的效果

  1. 右侧点击左侧滑动到对应元素,右侧滑动,根据偏移比例左侧滑动到对应位置
  2. 左侧滑动到某个区间,右侧高亮
  3. 顶部固定title,在滑动偏移差小于title高度时,fixed有个过渡效果。
------ 本文结束------
0%